Weekend Project - Ikea Rast overhaul
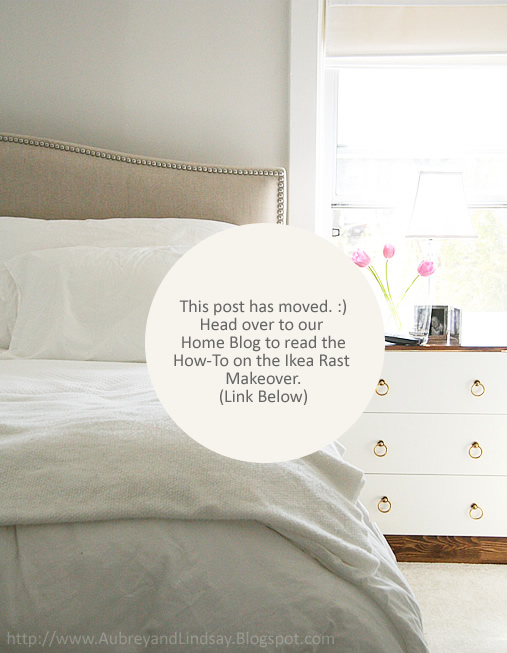
The instructions for my Ikea Rast hack are now over at our Home Blog at http://www.aubreyandlindsay.blogspot.com/
Click Here for the direct link to the project!
![]()

The instructions for my Ikea Rast hack are now over at our Home Blog at http://www.aubreyandlindsay.blogspot.com/
Click Here for the direct link to the project!
![]()
LOVE IT!
ReplyDeleteThat looks fantastic! Way to go! Hope to have an Ikea near us one of these days. You should post that to Ikea Hacker http://ikeahacker.blogspot.com/
ReplyDeleteVery cool. You put a great spin on it!
ReplyDeleteGreat job on the chest of draws.It looks beautiful. I also love your headboard where did you find it?
ReplyDeletethanks
Thank you!!
ReplyDeleteThe bed is the Colette bed from Crate and Barrel and is absolutely fantatic. West Elm has a similar bed that is less expensive, but I really liked that this one wasn't just a head board, but also had a beautiful base.
Lindsay
http://www.crateandbarrel.com/family.aspx?c=1012&f=1480&q=colette&fromLocation=Search&DIMID=400001&SearchPage=1
loved that you gave us the exact Benj Moore paint color. can u tell us the brand of stain and color you used. chest looks fabulous! thanks so much.
ReplyDeletecan u give us the brand of the stain and the color. looks great. thanks so much.
ReplyDeletehi,
ReplyDeletelooks great! this is a little off topic, but what color did you paint your bedroom? i love it!
what knobs did you use from Lee Valley? I'm having a hard time finding them on their site. Beautiful job on the side tables! :-)
ReplyDeleteYou are amazing!!! And I absolutley adore you for this post:) Would you mind sending the direct link to the bronze knobs? Ive been searching the web site and cannot find them.
ReplyDelete(1) KNOBS - The Knobs can be found here at Lee Valleys website, I chose the Burnished Bronze. I have to double check which size I bought..I'll update the post when I've measured for you. :)
ReplyDeletehttp://www.leevalley.com/hardware/page.aspx?c=1&p=48407&cat=3,43520,43521,43559
(2) STAIN - The stain was left over from the stain that we used when we put down new hardwood when we renovated. I know that the colour is "Antique Brown" but I'll find out the manufacturer. :)
(3) The room colour is my absolute favourite - it's Classic Gray by Benjamin Moore (OC-23). It's super soft in the day light, almost white, but at night its the most beautiful gray. Everything goes with it. :)
I for one would love to know who manufactured the stain. It's absolutely gorgeous. What a brilliant project, I might give it a try.
ReplyDeleteI love this bed!!! What color did you order the headboard in -- Alabaster or natural? It's so hard to tell in this picture
ReplyDeleteok, so hopefully you still check these comments! I'm attempting this DIY project this week and have a question - the white paint from Benjamin Moore, is it just the regular paint you paint your walls with? Is it the matte finish (bedroom) or the glossy finish (bathroom paint)?
ReplyDeleteThanks!
Totally gorgeous! I absolutely love it! Were you able to find out the brand of the "Antique Brown" stain?
ReplyDeleteOk, so here is the low down on the stain. I had to call our flooring guy who did our floors when we did the reno. (I used the leftover stain from him)as I couldn't find the tin we used for the project. He got back to me and here is the info:
ReplyDeleteBasic info - The colour we used was Antique Brown made by Duraseal.
Scott our flooring guy says that Duraseal is not sold in big box stores - but that the same company makes "Minwax" and small tins of Antique Brown MAY be available in the Minwax brand at Home Depot etc.
He said the only way he knows of to Antique Brown for sure would be to buy the Duraseal stuff from a specialty store.
I hope this helps!
-Lindsay
Did you paint the sides or inside bottom of the drawers?
ReplyDeleteHi Anonymous - I left the drawers untouched other than the front panel that you see that is painted white. I was concerned about paint getting into the "grooves" making it hard to open and shut the drawers. I had to go check to see what I had done, as I don't even notice the insides. ;)
ReplyDeleteI saw the gang on Cityline do this and LOVED it!! It's on my "to-do" list for sure. Great job.
ReplyDeleteHonestly, my jaw dropped. I just found this via Little Green Notebook. I cannot wait until I am near an Ikea so I can do the same thing (I might even be a total stalker and copy your wall paint!). I just purchased new bedlinen and was trying to work out how to tie it all together and here it is! Thanks!
ReplyDeleteWOW! I've seen your picture like five times on different blogs/forums in the last two days. This is def. a jaw dropper!!! Great job.
ReplyDeletei love this! looks great. what finish did you use in the paint?
ReplyDelete